业务工作
之前要做一个类似于装修模块的东西,比如app 首页,活动页等等,如下图所示
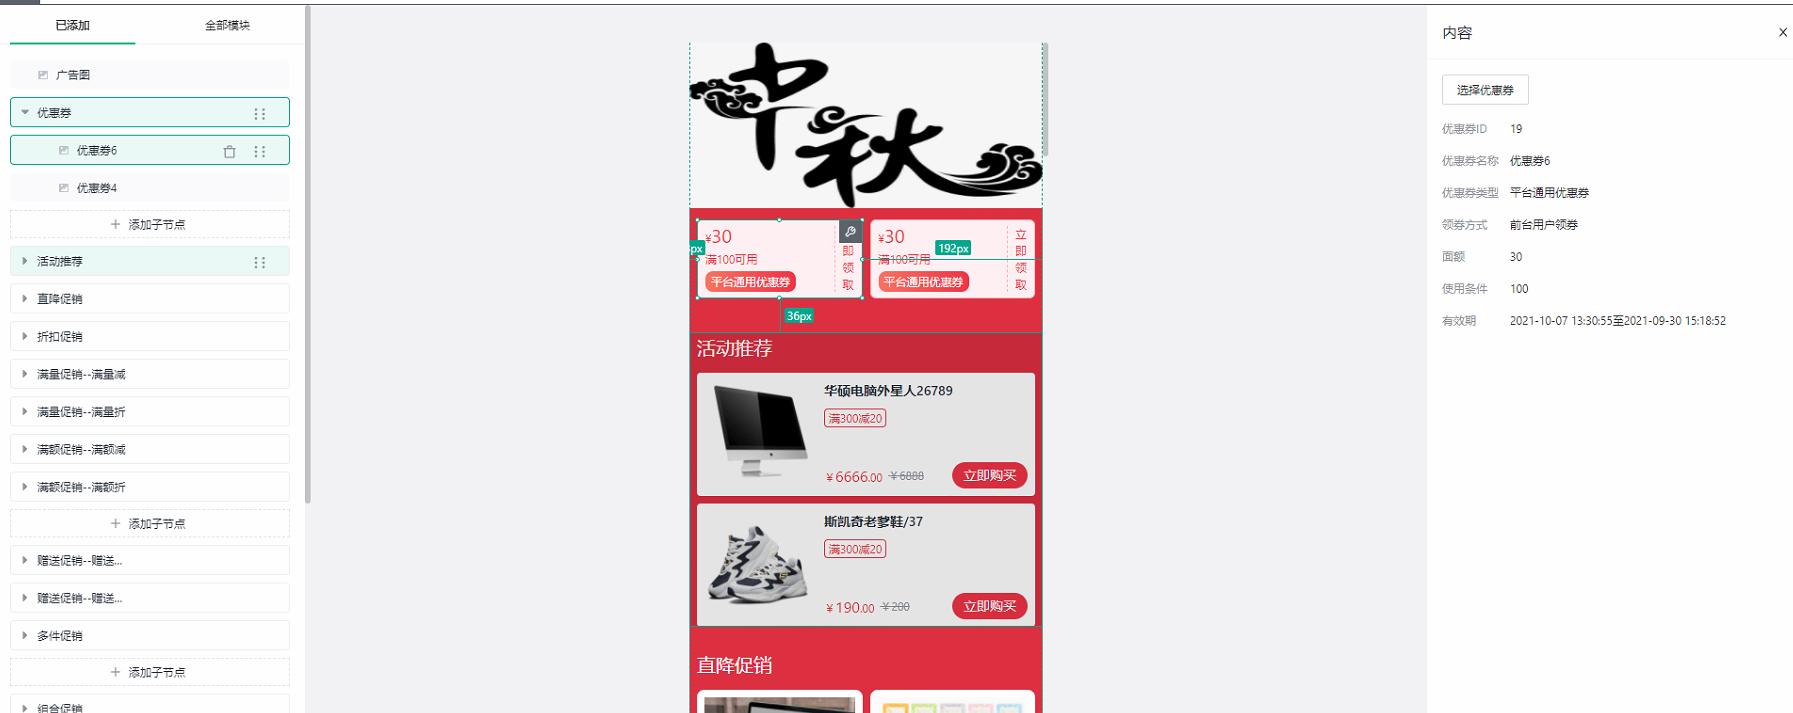
左边是一个组件树, 中间是整个内容模块的展示, 右边是对所选中的内容进行编辑
技术栈
因为之前同事是使用brick-design 做二次开发的,所以也就继续沿用了。
用lerna 去管理这些包,比如brick-design, 还有一些组件。最后build 的时候会放到私有源上
开发准备工作
因为brick-design 作为工具库,所以我们要通过yarn add 的方式去安装,所以在开发时候需要使用到npm link 到brick-design 上。
具体查看npm link
brick-design 原理
brick-design原理: 它是通过去维护整个pageConfig去实现组件自定义,pageConfig就是一个用数据结构表达的一颗树,每个节点都有一个props。
数据结构如下:
const pageConfig = {
    "1": {
        componentName: 'Layout',
        title: '组件树',
        props: {
            style: {
                width: '100%',
            }
        },
        childNodes: ['2']
    },
    "2": {
        componentName: 'CouponContainer', // 需要到 <BrickProvider config={} /> config 需要注册该组件, 不然会找不到该组件
        title: '优惠券容器',
        props: {},
        childNodes: ['3']
    },
    "3": {
        componentName: 'CouponItem',
        title: '优惠券1',
        props: {
            name: '优惠券名',
            id: '优惠券id'
        },
    }
}在用这个brick-design 的时候感觉原理上跟formily类似,pageConfig 相当于formily 的schema, 他们两同样需要对自定义的组件作注册事件
组件注册
实现CouponContainer 和 CouponItem
interface Iprops {
  children: React.ReactNode,
    /** 控制显示与隐藏 */
  visible: 0 | 1,
    /** 下面这些是brick-design 的属性,就是给这个容器在选中状态的样式等其余属性 */
  className: string,
  onClick?: () => void,
  onDrag?: () => void,
  onDragEnd?: () => void,
  onDragEnter?: () => void,
  onDragStart?: () => void,
  onMouseOver?: () => void,
  getOperateState?: any,
}

const Coupon: React.FC<Iprops> & { Item: typeof CouponItem } = (props: Iprops) => {
  const { children, className, visible = true, ...other } = props;
  const classNameStr = cx(
    styles.container,
    className,
  );
  const { onClick, onDrag, onDragEnd, onDragEnter, onDragStart, onMouseOver, getOperateState } = other;

  const divProps = {
    onClick, onDrag, onDragEnd, onDragEnter, onDragStart, onMouseOver,
  };
    // 这里做个提示:使用当前props的theme 配合 React.children.map, 以及React.cloneElement 形成不一样的布局,比如商品两列布局,或者是一行一个,
  return (
    <>
    {
      !!visible && (
        <div {...divProps} className={classNameStr}>
          {children}
        </div>
      ) || null
    }
    </>
  );
};


interface ItemIprops {
    id?: number
    name?: string,
    className: string,
    onClick: () => void,
    onDrag: () => void,
    onDragEnd: () => void,
    onDragEnter: () => void,
    onDragStart: () => void,
    onMouseOver: () => void,
    draggable?: false
    getOperateState: any,
}

const CouponItem: React.FC<ItemIprops> = (props: ItemIprops) => {
  const { className, ...other} = props;
  const { onClick, onDrag, onDragEnd, onDragEnter, onDragStart, onMouseOver, getOperateState, ...rest} = other;
  const { id, name } = rest;
  const divProps = {
    onClick, onDrag, onDragEnd, onDragEnter, onDragStart, onMouseOver,
  };
  const isNotNull = useMemo(() => id, [id]);
  return (
    <div className={cx(styles.item)}>
      <div {...divProps} className={className}>
        <CouponsItem id={id} name={name} isNull={!isNotNull} />
      </div>
    </div>
  );
};

Coupon.Item = CouponItem;
迷茫与改进
- 一开始是跟同事一样的做法,就是先写一个
pageConfig的一个模板,然后从后端请求接口后把当中的值一一塞进去。 - 在右边装修内容的时候写成了一个个单独的组件,只要一改变就会触发
pageConfig, 修改当前选择的组件的props, 甚至不需要按确认按钮,
这样变得非常难处理,无法做数据验证等等。 - 对于重复数据可继续选择问题, 即当我选择了一个id为1的优惠券时,我再新建一个子节点,我还能再继续选择这张优惠券,数据冗余。
改进
- 对于第一个问题,解决方案是根据后端返回的数据去构建一个
pageConfig, 而不是根据模板去一一塞过去。 hooks 如下
function useGetLayout() {
    const { id } = usePageStatus();
  const [detail, setDetail] = useState<DetailType | null>(null);
  const [loading, setLoading] = useState<boolean>(false);

    /** 获取布局 */
    useEffect(() => {
    let isValid = true;
        if (!id) {
            return;
        }
    async function fetchData() {
      setLoading(true);
      const { code, data } = await Api({id: id});
      if (!isValid) {
        return;
      }
      setLoading(false);
      if (code === 1000) {
        const isEmptyObject = Object.keys(data.adornContent).length === 0;
        const tempData = {
          ...data,
          adornContent: isEmptyObject ? DEFAULT_DATA : data.adornContent
        };
        setDetail(tempData as unknown as DetailType);
      }
    }
    fetchData();
    return () => {
      isValid = false;
    };
  }, [id]);

    /** 根据后端返回的布局内容去构建pageConfig, 一部分代码 */
    useEffect(() => {
        if (!detail) {
            return;
        }
        async function setData() {
            const { adornContent } = detail!;
            let startKey = 0;
            const firstChildKeys: string[] = [];
            let pageConfig = {};
            /** 未排序数组 */
            const dataSourceList: { key: keyof typeof adornContent, sort: number }[] = [];
            Object.keys(adornContent).map((_item: keyof typeof adornContent) => {
                dataSourceList.push({
                    key: _item,
                    sort: adornContent[_item].sort
                });
            });
            const sortedList = dataSourceList.sort((a, b) => a.sort - b.sort);
            for (const _row of sortedList) {
                startKey = startKey + 1;
                firstChildKeys.push(startKey.toString());
                const target = adornContent[_row.key];
                const currentProps = target.props;
                const childrenData = currentProps.childrenData || [];
                const props = _row.key === 'top' ? {
                    imageUrl: currentProps.imageUrl
                    } : {
                        visible: currentProps.visible || true,
                        theme: currentProps.theme || 0,
                        title: currentProps.title,
                    };
                const childPropsData = _row.key === 'top' ? {} : {
                    childComponentName: `${CHILD_COMPONENT_NAME[_row.key]}`,
                    addBtnText: '添加子节点',
                    childProps: {
                        otherProps: {
                            type: `${_row.key}Item`
                        },
                    },
                };
                let tempConfig = {
                    componentName: COMPONENT_NAME[_row.key],
                    title: title[_row.key] || currentProps.title,
                    props: props,
                    otherProps: {
                        type: _row.key
                    },
                    canDelete: false,
                    ...childPropsData,
                    childNodes: [],
                };
                const childNodesKeys: string[] = [];
                /**
                 * @tofix
                 * 这里不应该这么写,但是后端的接口分了一块一块,那也没办法
                 * 这里应该先根据后端返回的结果先在前端处理一遍,变成 {key: [1, 2, 3], key2: [2,3,4]} 这样的数据结构,然后请求后端接口,让后端一次返回所有数据
                 * 而不是一块一块的去请求借口
                 */
                if ( childrenData.length > 0) {
                    /** 这里用key value 的形式对应formated data ,格式化请求前的数据*/
                    const formatedData = formatData[_row.key]?.(childrenData);
                    /** 这里用key value 的形式对应api */
                    const requestData = await service[_row.key]?.(formatedData, { ctlType: 'none' });
                    /** 这里用key value 的形式对应formated data ,格式化请求后的数据*/
                    const afterRequestFormatedData = afterRequestFormat[_row.key]?.(requestData);
                    afterRequestFormatedData?.forEach((_item, _index) => {
                        const keyNum = `${startKey}-${_index + 1}`;
                        childNodesKeys.push(keyNum);
                        const sonConfig = {
                            componentName: `${CHILD_COMPONENT_NAME[_row.key]}`,
                            title: _item?.productName || _item.name,
                            props: {
                                ..._item,
                            },
                            otherProps: {
                                type:  `${_row.key}Item`
                            },
                            childNodes: []
                        };
                        pageConfig[keyNum] = sonConfig;
                    });
                }

                tempConfig = {
                    ...tempConfig,
                    childNodes: childNodesKeys
                };
                pageConfig[startKey] = tempConfig;
            }
            pageConfig = {
                0: {
                    "componentName": "MallLayout",
                    title: '组件树',
                    "props": {
                        "style": {
                            "width": "100%",
                        }
                    },
                    "childNodes": firstChildKeys
                },
                ...pageConfig,
            };

            console.log("pageConfig", pageConfig);
            updatePageConfig(pageConfig);

        }
        setData();
    }, [detail]);
}- 针对第二个问题,改用formily,把编辑内容变成
form, 或者formily - 针对第三个问题,再写一个
hook,针对pageConfig发生改变时,返回已有的key:value值,根据选择组件获取对应的key.即sameKey[selectInfo.key],在table设置rowSelection 设置disabled既可, 数据接口如下:
{
    coupon: [1, 2],
    hot: [251, 235],
    discount: [251, 235]
}
APP 端显示
app 那边使用的是 react-native,
那么写一个获取layout 布局以及 获取数据的hook, 这样做既可以把逻辑抽离,又优雅,到时候迁移到小程序上就方便多了
因为我们的数据格式是:
{
    coupon: {
        sort: 1,
        title: '优惠券',
        childrenData: [
            { type: 1, id: 1 },
            { type: 2, id: 2 }
        ]
    },
    hot: {
        sort: 2,
        title: '推荐',
        childrenData: [231, 255]
    },
    discount: {
        sort: 3,
        title: '折扣',
        childrenData: [231, 255]
    },
}
先通过前端筛选数据,将空值筛选掉,然后提交给后端, 后端一样key,value 这样返回数据,
// 前端提交给后端的数据格式
{
    coupon:[
        { type: 1, id: 1 },
        { type: 2, id: 2 },
    ],
    hot: [231, 255],
    discount: [231, 255]
}

// 后端返回给前端的数据格式, 如下
{
    coupon:[
        { type: 1, id: 1, name: '优惠券1' },
        { type: 2, id: 2,  name: '优惠券2' },
    ],
    hot: [
        { title: '商品1', id: 231 },
    ]
}迷惑行为:不知道为什么其他同事都是一块内容一个接口,让我感觉非常迷惑。 这样导致的结果就是,一个页面n 多个接口,逻辑难以复用, 且太多if/else。
因为个人不太喜欢写if/else, 本人一般会用 Map 去代替if/else。
最后, 只要遍历activityData 并写相对应的容器组件即可,比如 Coupon, CommodityList,
// activityData
[
    {
        sort: 1,
        name: 'coupon',
        dataSource: [
            { type: 1, id: 1, name: '优惠券1' },
            { type: 2, id: 2,  name: '优惠券2' },
        ]
    },
    {
        sort: 2,
        name: 'hot',
        dataSource: [
            { title: '商品1', id: 231 },
        ]
    }
]<ScrollView style={styles.scrollView} scrollIndicatorInsets={{ right: 1 }}>
{
activityData.map((_item: any, _index: number) => {
const componentName = ACTIVITY_TYPE.includes(_item.name) 'commodityList' : _item.name
const Component = ComponentMap[componentName];
if (!Component) {
return null
}
// eslint-disable-next-line react/no-array-index-key
return <Component key={`${_item.name}-${_index}`} activityType={_item.name} {..._item} />
})
}
</ScrollView>